Saturday, November 15, 2008

A favorite blog of mine

Do you go there too? They have such great tips and share the best of mom-prenurer sites. With spare time so limited these days, I am lucky to get in a few moments with some of my favorite friends blogs and this one. Oh, they have such great give-a-ways too. One of these days I am going to win, I mean, it could happen right?

Check out the Mom-preneur Shop-a-thon going on right now! Gorgeous purses are up today!


You just got to love a site like that!

Tuesday, October 7, 2008

As promised, New Art!

When I first got my Bigz Scallop Card die (Sizzix) from Terryfic Times, I knew it was really a banner in disguise. I have been wanting to make this ever since! I already have several backgrounds ready to go for new sayings. They will go to a craft bazaar.

As you can see, I didn't have much luck at photographing it. But the scanner didn't do too bad. You still can't really see just how much this pops, or the glitter from the Stardust pen adding just the right touch but you should get an idea.....

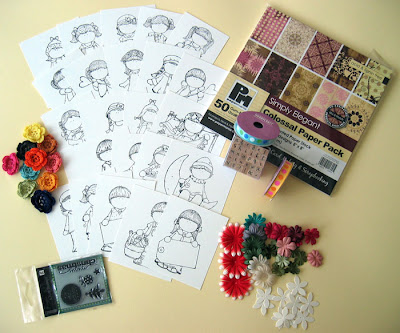
These are cut from cardboard and white glossy card stock, then glued together for stability.

Once the backgrounds are created, I stamp the flourishes and main images in White, dry, then off stamp again in black.

I dry the inks then seal first with a U.V. sealer, then with a couple of coats of glossy.

Now to add the details, lots of Souffle pen work, Stardust pen work, adding the eyelets and "jump rings" (which are really tiny slinky type rings)!

Add the flowers, and ribbons, and anything else that suits your fancy, and what a gift! Well, at least I think so. :-)

By the way, the letters are Indulgence by Spellbinders.

So, do please leave a comment, share the URL, and if you make some, let me see!

Creatively,
Cindy Cade

Selling off artsty extras

Hi all,

Yes, I still exist. :-) I am still doing a lot of catching up. Yep, my life's mantra! LOL! This week I will be spending most of my time painting one of our rentals. Pray we get good renters so I have money to spend! We are good landlords (though I really hate that term).

Now, on to the meat of this post. As time goes by I am going to be uploading items for sale on my picture trail. I will send notes about them here too. Most of these are either duplicates in my studio or left over from my store "Artistic Extras." I prefer PayPal as I think it is easier for us all but a certified or personal check will also do. I cannot ship until funds have been cleared. Shipping will be actual and I suggest getting insurance if you are spending enough to be concerned. Once it leaves my door I cannot be responsible, Okay?

I have been working on a pretty cool project. I will be posting it in a day or few. So do check back. I think you will like it! It uses my die cut machine, dies, stamps and well you shall see!

If you have any questions write to me at: cjcmlc@horizonview.net

You can see the sale items (more will be added as time allows and removed when sold) at: http://www.picturetrail.com/sfx/album/view/20698804

There is even a brand new in package Big Shot kit! I love my die cut machines and dies but this is the one I use most, it is just so easy.

Okay, I have to get to work. Hugs all!

Saturday, September 13, 2008

It has been awhile but....

I am getting closer!

I have lost 25#s and can't believe that just a few short months ago I was wheel-chaired through the Creation Museum because my legs wouldn't carry me that distance. Now, I could do it with no problem! Woohoo!

I have had my third day without a catastrophe (though this computer is still putting up some good fights). I am getting a few things caught up and have lots of plans and ideas running through my brain. I am so ready to play.

Also, you may notice a new button on the top right of my blog. For those of you who sell items online, be they homemade, retail or digital, here is a group that let's you trade with other web mom and pop shops. How cool is that?

Now, I know I closed my store several months back. I am not planning (at least not at this point) on going back to retail but I am going to be sharing some of my art for sale online. I have too many ideas to let sit idle so why not? Christmas is coming, as are birthdays, Sundays, I made it out of bed days, and so many other just reasons (like we really need one) to shop, right? I love the idea of supporting each other. Handmade from the hART is always best in my opinion!

OK, off to bed with me. I have plans for tomorrow.

Hugs you all and thanks for taking time to comment. It is so fun to read. BTW, miss LH, and you know who you are, it was really difficult only getting to have one name drawn. I wanted to hand pick winners. But then, I would have had to pick them all. :-)

Creatively....

Thursday, August 21, 2008

Today I am thankful for...

My church. I have a pastor who preaches the Word of God without comprimise. He isn't afraid to call sin, sin. He will tell you that only by believing on Jesus Christ can one be saved. Yes, saved. I don't share this to offend anyone but if your church doesn't do these two minor things you may want to pray about what you should do.

Our congregation is small. Let's face it churches who only give motivational talks are a lot more popular.

I want my church to love me enough to point out my faults as well as my good points and to do so in love.

"For the time will come when they will not endure sound doctrine; but wanting to have their ears tickled, they will accumulate for themselves teachers in accordance to their own desires;"
"and will turn away their ears from the truth, and will turn aside to myths." (2 Tim 4:3-4 NASB)

Cheers!

Hope is a great word....

I am 16#s lighter and I think it all must be from the weight on my heart!
You see I have not been able to muster up the strength to even begin a diet for years, but I recently dropped my depression medicine and my blood pressure medicine (yes I weened off of them both) as they made me tired. I am also convinced they have made me obese! What an ugly word! Actually morbidly obese. Now that is downright scary but fitting.

I joined Sparkpeople (I am continuing to totally love this site) and it has all the tools and support one could ever want or need. Amazing that it is free, God bless them everyone!

Since then I have found that I am ADHD. Some of you probably already guessed this just by the way I write. I do it the same way I think. I mean have you ever known anyone who used "( )" so often? That is my mind wandering. I know I should just incorporate a new sentence but being queen of something is better than nought right?

Why would I share this find about myself? Because it is again a source of hope for me. After decades of knowing I am "wired" differently than the rest of the world it is nice to have it medically confirmed. It explains my disorganized thought processes, same with my lifestyle, why I can't listen to someone intently if there is any other sound in the room or motion for that matter. One other thing about us ADD folks, we are usually very creative. Hmm, anyone out there relating? Maybe you should do a study.

My pastor loaned me a book entitled "Driven to Distraction" and it was like someone peered inside my brain and took notes. In all my life I have never had a proper diagnosis. I have begun medicine to help. This could take awhile to get right. I am also learning how to better organize my life. That is hard because I am a "now" person. If it takes long term obligation and a lot of steps I will have to push myself. This is also typical of ADD/ADHD.

Now, I have two great things to add to my new found hope list.

First, since beginning my diet my blood pressure is in the good zone! No kidding! I haven't even lost a lot of weight (yet) but I did drop all the soda (pop) as well as candy, doughnuts, etc.

Second, the medicine they put me on has a certain side effect that can work for me, it is supposed to oppress the appetite! Hopefully that will prove true when they up my meds. I am on too low a dose at the moment to feel anything. BUT I have hope!

I now believe that I will get my studio organized again, get the garage emptied, and perhaps even get the kids back on track in their own rooms. My boy has ADD too, which is how I actually found out that I do.

I am expecting great changes.

Hey, btw, for those who know me almost too well, I quit demoing for the last couple of years because I kept breaking out in sweats. It was embarrassing to say the least. For the first time in a decade I was able to wear layers to church last Sunday without being overheated. Woohoo!

Look out world, Cindy is coming back and will be better than ever!

Friday, August 15, 2008

Winner of my first ever blog candy is.....

Ms Brenda aka Dragonlady! Here is her post...

Dragonlady said...
WOW, am I glad I stumbled on your blog from another one....I love the Bamboo purses, they are incredible....and Beautiful....I posted to my blog and I added you to the links...I want it....Brenda

I went to see your site and it looks as though the random generator chose someone who will have fun with this kit. I can't wait to see what you do with it!

Congratulations! BTW, have you seen the Google search title this week? You will love it!

Thank you everyone for playing. Keep checking back because I will be having more candy soon.

Wednesday, August 13, 2008

What a week, well what goes down must come up right???

Tell me I am right! Well, I do have my computer running. Yay for that! Got my Internet back, and am able to receive my email. I lost so much! Passwords, tutorials, pictures, all of my documents! Sigh. But, I am back and that is a good place to start. It's a brand new day, right?

Reminder, my blog candy contest ends on the 15th. If you haven't left a comment on that post, please do. You never know, you could be showing off your own stamped version of my bamboo purse.

I have some catching up to do but my brain is overflowing with ideas. Hey Suze, two of them I think you are going to love but I am not telling yet. (It is possible that what I see in my head won't work in reality right)?

I went to Stampaway over the weekend. It was nice to spend time with other adults especially who think like I do. We are a peculiar bunch aren't we? LOL!

I have decided that I hate Mary Jo, ('course she knows that I really love her) but she had to make those Copics impossible to resist. As soon as budget allows I am going to have to get some I suppose. Oh, speaking of mary jo, she gave me her card with her blog addy on it. How did I not have this one in my arsenal? I am going to check it out. If you haven't you best do it too. You don't want me to know something you don't yet right? She is so honest and down to earth. If she says it she means it. I like that in a person!

Okay, it is late for me and I need to try and get some sleep. I promise it won't all be chatter.

Creatively......

Tuesday, August 5, 2008

Today I am thankful for...

My computer. Yes, it can drive me crazy but it is such a blessing to my life. Hmm, that sounds like my kids....

Life can be challenging... computer problems

So I started having trouble getting to my blog. I do all the things suggested here at Google, but none worked. So I try to find the problem, it must be my spyware right? I did change some settings there.... guess what, it won't let me change them. So I try to log on at an earlier date setting... no help there. I still can't get to my blogs (which by the way they had even sent me a new password for and then told me there was nothing else they could do for privacy purposes). I was on my own. That is not a good thing. I drive these things but am not savvy enough to fix them.

Oh, one thing I am inserting here, some folks are saying they had problems because of their page counters so I have removed mine just in case.

So how is it that I am here today? Since my main computer is nutso (so bad now that I can't even get it started, says I am missing a certain .dll file which I need to install before it can load. Umm, how do you load a file when your computer won't load? I mean there was a time when I could maybe have done this at the computer prompt but since that isn't even a choice, well, this poor (literally) woman is just plain stuck! Oh yea, how I am here, I hooked up an old computer of mine. It has vision problems, kink of like looking at the print during a wind blown rain. But at least I can get here and to my banking, my Google reader, my email and groups and Sparkpeople where I keep track of my calories and so much more. Hey I believe the computer has an umbilical cord connected straight to me! Yep, I have been dying.

So now the next step for me in the frustrating saga? I need to find the box that has the original computer disks to reload on my other computer. I have gone through at least 30 to 40 boxes that are yet unpacked and no luck thus far. I am also going to check my portable zip drive and see if that file is there. I may find someone who can tell me how to get it on my other 'puter right? Maybe?

So, I will not be crafting for awhile it seems. I won't bother you all with my sad story until it is resolved. If you are wise to my problems and leave a comment of advice I intend to check here to see. It would be most appreciated.

Frankly if you read this you must be one of my most sincere friends and God bless you!

Creatively until next blog.....

Saturday, August 2, 2008

Shout Outs! Brad tute, Amazing help dieters...

Okay, I have to tell you that I recently began my "new life style" aka diet. LOL! I am thrilled to announce that I have hit the 10# mark! Now to repeat that 9 more times.... anyway, I want to share the website that is super for tracking what you eat, finding the help you need to get and (I hope) keep you motivated and so much more! It's called Sparkpeople and you can find the link at the right of my blog. Did I mention the entire thing is free?
Oh, they even have a Sparkgroup for rubberstampers, yea it was the first one I added myself too. LOL!

Now, for the other shout out. For a long time I have been wanting to put together a tutorial on dressing up brads. I don't have to anymore because at Mel Stampz you will find a wonderful article with great inspirational pictures to boot! If you don't have her site in your google reader (Okay I snuck another shout in but this is where I keep up with all the blogs I love so easily) add it!

Have you ever noticed my writing meanders just like my mind???

Friday, August 1, 2008

Leafing It to Autumn

So much to learn and do and so little time! I bet you can relate to that statement too right?

While at the Artists of the Round Table bash recently, one of the attendees taught us a couple types of marbling. The first sample uses the easiest form aka Suminagashi.
Autumn is my favorite season of the year and tonight’s class utilizes three main dies by Spellbinders that have leaves on them. I am not going to go into how to use the Wizard the instructions are on a DVD you now get with the machine. The three dies are:
S4076 Assorted Leaves
S4011 Harvest 2 Leaves
S3092 Foliage
In this first sample I cut three leaves from the Suminagashi paper I made. I spent an entire day watching all of season five of Smallville and made papers what fun! I have a nice stash ready. I made them in card size.
Encaustic wax technique.
I used regular and pearl crayons on black glossy for this one. The next few show different samples I prepared. I like how when I ran it through it kind of took a little off the edge so I pulled some off the veins on purpose.

This is another easy and fun tech. You will also note I used the oval dies to make the window and one of my new textures to add the dimension to the layered piece. Cindyc loves her textures!!!


This scan looks messy but the card is gorgeous. After cutting out the leaves, I used the discarded paper with the leaf shape holes as a stencil and chalked on color using my Judi-Kins Color Dusters.

I then traced with a Stardust pen. You can't see it in the picture but it is stunning!

You know how Northwoods always has glitter cards that stop everyone in their tracks? They are just the right light touch of glitter. Well this is that look without the hassle! Just trace and you get just a perfect hint of sparkle. They will be great with the new snowflake dies too!

TIP: If you cut your shape from thin craft foam you could use paste for a thick design.

On to 4:
Now Spellbinders does have a nice slim doll type die that they carry but those who know me wouldn't recognize me trim... giggle. So I used the child doll die for me. Much better!

If you looked ahead you will see what I used for her clothes and wings. In this case it was Kroger’s version of Dr. Pepper cans. Yes, pop cans! The thin aluminum in most soda cans works fine. I would guess most beer cans too but can't say for sure. Just cut & emboss like paper in your Wizard. I then added Adirondack alcohol inks.

The doll was stamped and the background made using the polish stone technique then stamped too with a leaf stamp from HIT.


Notice the pop cans in the next pic and then the following pic shows the embossed cans before coloring. A pretty look all by itself.


On to 5!

Now this one is a bit more complicated as I couldn't stop myself. First notice the following pic; it is a scrap piece of butcher paper left over when I made my scarf with the Adirondack color sprays. I have a lot of it and it is gorgeous! Lol

First I die cut some Harvest 2 leaves from fun foam aka craft foam. I then used them as stamps. I decided I wanted some dimension so I traced the leaves with an embossing marker and poured on Ranger Distress Powders and heated. Remember with Ranger Distress Powders you shake, pour on, heat, and rub off excess to get the “grains” out.

Once the leaves were done I added the flowers. Then it needed something down at the bottom. I chose a thin metal charm that comes in a silver color. This one says “create.” I usually use these to emboss into aluminum foil tape.

I wanted color and texture so I used one of my new textures and ran through. It gives it a lot of angles to catch the light. I then did the polish stone technique on it as well.

See that big yellow circle in the large flower? It is a Great Big Brads! The brads are about the size of a nickel and come in colors and metallic! I plan to emboss those.


Ok, see 6:

Just to throw more ideas at you…. Here the leaves and acorns from the Harvest 2 die are cut from wall paper (via free books). After dry embossing I added more color to the veins by brayering ink on. ‘So simple! I then cut strips from the paper for borders to complete the card.


See 7: What do you see?

I’ll tell ya a Dominos pizza ad! Yes, Scoutdogs, I cut a pizza. Lol! Don’t toss those glossy ads... very handy and aren't the colors perfect?

Ok, on 8: I used a technique I had forgotten about, the lost Burnt bag technique! I used cereal cardboard instead of brown bag. After cutting your shapes smear white school glue all over. Then heat the glue over a hot candle or fire starter. Put it in the fire and keep moving. It will get very sooty. Then set aside to be sure glue is dry. Once dry and cool gently wipe off the soot.

You will get a shiny surface that is very cool. Leave as is or add metallic rub-ons or… take it a step further and add the butterscotch Adirondack alcohol ink. It is super yummy! These would make great hair barrettes or other embellishments.

Try it you will be surprised!

TIP: Keep a tub of water handy just in case. Safety first!

See 9:

I made this for CHA (Spellbinders) a couple of years ago. The leaves on the box are copper that have been heated for color. I think Stacey hauled that box everywhere for about a year. It has been places I will never get to, lucky box. Ü

See 10:

The leaves here were done the same way. The bottle caps were flattened in the Wizard and the polished stone letters are from the Vintage font aka spellbinders! (Two fonts in one). The turkey was colored with chalk

See 11:

“Boo” and the “ghosts” were done with vellum, perfect for this. The pumpkins were transferred in the Wizard using an inkjet printer and “Stewart Superior Transfer Medium” to muslin.

The frame was cut and textured in Wizard too.

Samples as well as instructions are copyrighted and may not be used without the owners permission. Thank you.

Today I am Thankful For..."

The amazing friends I have made over the years thanks to stamping and the web. YOU all know who you are. You have enriched my life in so many ways. I only wish I could meet and create with you all!

Tuesday, July 29, 2008

The Cat's in the Bag©

By Cindy Cade


SUPPLIES:

Scot-It Board
Movable Parts “Just Cats”
Fishing Line or nylon thread
Glue
Tape
Heart template
Copper Tooling Foil
Stylus
Scissors
10 pieces of cardstock cut to 6” by 10” (five for the back of the pages and 5 for the fronts)
Stewart Superior Memories Chestnut Brown ink pad
Ranger Industries Library Green Dye ink pad
“Hearts” and “Cupid” dies by Sizzix
Wizard Die Cut Machine by Spellbinders
Alphabet Stamps
You can find most of these items available at Terryfic Times great prices and service!

DIRECTIONS:
PAGE BACKS:

I chose to use different colors for the fronts and backs. This is optional.
Simply score in the centers (five inches) fold and flatten with your score tool or bone folder.
TUNNEL PAGES:

Score every two and ½ inches producing two mountain folds and one valley fold. Fold and flatten with your score tool or bone folder.
HEART TEMPLATE:


Free cut a heart shape that is approximately 3 ½” wide by 3” tall. Fold in half and use this to score your heart shape on the tunnel pages.

Simply fold the page in half and lay the heart over the fold and trace the template with your stylus or light pencil. If using a pencil it is best to score on the back of the page. Cut out your heart. Now use this first page as your template for your other tunnel pages. Unfold and lay on top of each page and score. You will get the same placement this way.

HEART CHARMS:


I used a Sizzix die to cut out my hearts. I ran it through my Wizard twice producing 8 hearts. I also used the Sizzix Cupid die cutting two.


Use a strong adhesive (I used my 3m tape in my ATG runner) on the back side of four hearts and one cupid. Add your nylon thread and sandwich the matching shape to the back. Now take the hearts to your Scor-It Board and texture.

Tape these to the back center fold of your tunnel pages just above the cut out so the charm dangles freely in the center of the opening.

ASSEMBLY:


Choose the order you would like your charm pages to be and assemble as shown. Take your time to do this right. I used my ATG runner for this.

COVERS:

I simply cut some brown craft paper to layer on the front and the back and taped in place. Score one of the cut out hearts and add chalk to highlight. Adhere to cover.
Now is the time to add those adorable cats. I used my Xyron to make them stick.
On the back page, I used the “Just Cats” card as a stencil and colored with Chestnut Brown Memories Ink. It makes a great stencil!

Finally, I made a little bag to put my book in. With all of those charms wanting to dangle outside the book you couldn’t use a simple enclosure. Besides how fun it is to say; the cat’s in the bag!

If you wish to make a bag simply wrap paper around your book. To avoid having to measure, I just creased the sides where they would fit around the book, took the paper to my Scor-It Board and scored. Then wrap around your book again and tape to form the bag. Slip a box inside and fold the bottom edge as you would a present. Cut the top with pinking shears and add the “Cats” word cut again from the piece that you cats came on.

You are done.

My tip for you!

If you use your Scor-It as much as I do you may find this helpful. Keep a block of beeswax nearby and rub the groove of your tool on the edge. It will now glide on your paper. Repeat as necessary.

Creatively,
Cindy Cade
cjcmlc@horizonview.net

Today I am Thankful For...

A new addition to my blogs will be the "Today I am Thankful For..." comments. You are welcome to pop one of yours up in the comments section. I will be reading them.

You see, I have this problem with so much negativism in my world. I want to add more balance and joy to my life!

Naturally, as a Christian, I would be amiss not to say thank you to my Heavenly Father for sending His son Jesus, to bear my sins of disbelief and self will which are the sources of all other sin. Andre' Crouch used to sing in one of his songs. "He (meaning Jesus the Christ) looked beyond my faults and saw my need." That touched my heart and still does. No one is perfect, believe me, I never was and know I never will or can be in this world, but I am accepted and loved. What a great and liberating concept!

I am also grateful for my family, my faithful and loving husband, all of my children, my pets past and present and my parents, siblings and yes even in laws.

Don't worry future thankful blogs will be shorter! It may even be a simple word or sentence.

So, is there anything you are thankful for?

creatively,

Monday, July 28, 2008

Bamboo Purse Blanks aka Mats and a Great Source!

I promised I would post if folks shared where they found the mats.

The best deal I found (Wow) is from Mrs. Lins Kitchen On sale for $4.25 each! I can't touch that price! And they have all the colors!

My buddy Laurie Hunt found them at Two Sticks for $9.00 each but they did not have the natural color.

I found a seller at EBAY that has them for $11.99

Another friend, Diane Adams, said she found some at her TJ Max.

And with that it is time for me to move on to new subjects on this blog. ;-)

Saturday, July 26, 2008

Something good out there waits...

Those who know me would tell you I am not a "cutesy" person. Lately I am being won over but some wonderfully sweet faces. What can I say, they remind me of my just turned 8 y/o dd and 9 y/o ds. Shh, don't tell okay? ;-)

Check out "All Things I Love" where Bev has lots for eye candy and a nice blog candy contest going on right now too! You have until August 9th on her blog!

Tuesday, July 22, 2008

Two more bamboo purses


Another of my bamboo purses featuring Embossing Arts Stamps.


This one uses stamps by Evolving Images
These tiles were a bit larger.


My First Blog Candy!

So you want to make your own Bamboo purse? Here are the two main ingredients needed. Yes, both the tile mat and purse liner could be yours if your name/number is called.

How do I win you wonder? It is simple!
Just add my Artistic Extras Blog link to your blog and leave a comment telling me where to see it.

Don't have a blog? Just leave a comment about my purse and promise to share my blog with at least 3 of you best artist friends.

Seeing as my blog is so new I will use a random generator to pick the winner on (or about) August 15th!

Bamboo Purse Tutorial

By Cindy Cade©


This is probably my most popular tutorial. Should you decide to make one expect a lot of compliments and questions.
We begin with a simple bamboo tiled placemat. Do NOT take the mat apart. Depending on the size and shape of your mat you will fold in half either vertically or horizontally.
Some that are longer will not work out to even rows and will not have an actual flat bottom. The ones I carry are a bit smaller and you end up with an extra row at the bottom which is very handy!
Now depending on the color of your tiles, you will either clean them and stamp directly or put down a coat of paint to stamp on.
Once cleaned and dried we are ready.
First take a scan of your mat. You only need the amount of rows that will make up one side of your purse. Print. Take whatever stamps you think you might like in your layout and stamp them onto a piece of transparency. Cut the pieces out. You can move these stamped pieces around on your template to see if the stamps will work well on a tile
grid and where the best placement will be. If you happen to have a digital camera, I suggest taking a picture of the completed layout to use as a guide.

Now, ink up your unmounted stamp with a permanent ink. I chose Stewart Superior India Ink Black. Pick the inked stamp up carefully by the edges and lay on the bamboo tiles. Hold in place with one hand while gently pushing all over with the other until you feel you have transferred the entire image. Lift carefully. Most likely you will make a mistake or two along the way, they are quite slippery. If you do, quickly remove the spot
with a rag. If that doesn’t work use which ever ink remover is recommended for your brand of ink. Finally if it is already set into the bamboo you can sand.

(Side 2)
Heat set after every stamping so as to avoid smearing.
Now to ad color. You can use about anything, Versacraft inks, oil pencils, markers, dye inks, just be sure to dry and heat set. After coloring the images ad lots of color (well I do!) to the background by applying with your fingers. I used both Adirondacks dye and Archival inks.

Once the coloring is complete dry fully. Seal with several coats of Krylon UV protective matte sealer and a coat or two at the end with gloss if desired drying fully between coats.
To build the purse: This next step is very fortunate since my sewing machine is unreachable at the moment. The mats I use are the perfect size to combine with the child size tote bags found in the craft department at Walmart as your liner! They do make a nice size, not too big, not too small, purse too.

Personally I like the addition of fibers. To add them I punched holes in the liner and added eyelets to tie them through. See the picture.
Plan where the eyelets will line up with the spaces left between the tiles in the bag when inserting.
Lace up the side of the mat. I have used both organza ribbon and satin cording for this. Don’t lace too tight as you want to be able to open your purse! You may begin lacing from the top down or visa versa.
I added the fibers to match (ribbon/cording) and tied beads.
Finally, attach Velcro to the purse by cutting adhesive backed strips about the vertical length of the tiles. Attach them to the tiles with the scratchy side facing the tiles and the fuzzy soft side facing the liner. Remove the backing from the smooth side now and adhere to the inserted liner. This way they will line up perfectly. It is the Velcro that will carry the weight of the bamboo and hold the purse together.
I highly suggest that you sew the smooth side to your liner for extra strength.
Your purse is complete. Make a matching key ring if you happen to have bought extra mats.
All rubber stamp images used for this sample are the property of Hearts In Touch.

Random Thoughts

Tutorials, techniques, tips, shortcuts, substitutions on a budget, yea I love all of these things.
As I figure out what all it is that I want to accomplish here I will be adding some of my tutes and finds from time past. If you are in a hurry for them feel free to join my CC's Tutes yahoo group. With this blog I may eventually just switch it all here. I am not sure just yet.

Sunday, July 20, 2008

Flourished Windows

What does one do when they don't have all the going trendy tools? Why they improvise of course! And so I have.

I wanted to use one of my Shakers and Movers die kits, the one with three windows. (I purchased mine from Terryfic Times). Now, I am sure I could have used the window die three times to get nine windows, but I like things easy and knew they would be a great investment so I purchased three of them. Bam, nine windows and the card cut in one run. If you think I am compulsive, you will be sure when I tell you I just ordered two more of these 3-window dies so I can make cards with 15 windows at once. LOL

Okay, on with the card. Having cut the windows, I stamped my chosen image (imagine it has windows too, I see a clear theme here....) called "Scripted Sculpture" from Diva Impressions on an orange/white cardstock. I then added more color with Marvy Matchables #5 yellow, #92 celery, and #9 pink.


Next I wanted some flourishes that are so popular right now stamped on the background but alas I have none. So I took my Sizzix Bigz Die - Decorative Accent w/Flower and cut a piece of fun foam. I slapped that baby on my acrylic block and a stamp was born. I stamped with Stewart Superior India Black. I also cut some doodles from the same die using Prismatics swatch book (also from Terryific Times).

I glued my pieces in place and backed the windows with yellow ochre cs.

Finally I doodled lots of white dots and stripes with my Ranger Opaque White pen.

Is this fun or what? LOL! It was a good Sunday.

Creatively.......

Wednesday, July 16, 2008

My House Dress

I call this card "My House Dress" and I bet you can imagine why. This uses several inks on white glossy just smooshed. Then "paint" on bleach. That is the main background. The dotted one was done with a Cuttlebug folder then inked with black on the raised dots.

The dress: I stamped the Diva Impressions rubber stamp (very cool ya?) with Stewart Superior's India Black and heat set. I then stamped the music note image with Top Boss embossing ink and added clear embossing powder and heated. I then layered on color using Marvy dye inks. Finally I cut out the dress shape using my own designed template.

I doodled on some dots and stamped part of the "house" on to the top of the dress to give a finished look before layering it all.

The Diva Sisters

It has been awhile, I know. This is all an experiment for now. I know I MUST blog, it is the accepted way to share these days, but shoot, those groups are so easy to do!

Let's play just a bit here and see:

Hmm, it is easy to add images! Hey I may just find I like this after all.

So, the main image is from Diva Impressions whom I happily stumbled upon recently. Pink and brown are so yummy together don't you think? Add some great organza ribbon and kapow!